In this tutorial you will learn step by step how to make a pendant with a bezel made from wire. I recommend starting with a stone that is round or oval if you are just starting. I use 28 gauge wire in this tutorial, but if you are new to wire working you may want to use 26 gauge, as 28 gauge can break easily if too much tension is put on it.
Tools and Materials:
16 gauge copper wire – length depends on the size of the stone you are using The stone pictured is a little over an inch in height. Just make sure you have enough to make the bail later on.
28 or 26 gauge copper wire – for the stone I am wrapping I start with about 36″ of wire. Add more if you are using a larger cabochon.
Cabochon
Steel Bench Block
Planishing or Chasing Hammer
Wire Cutters
Round Nose Pliers
Chain Nose Pliers
A small jump ring mandrel or a 12 gauge piece of wire
Jeweler’s File
Liver of Sulfur (optional)
Step 1: Take your length of 16 gauge wire and begin to shape it around your cabochon. Using the back of your cabochon as a guide, make sure the wire frame is slightly smaller that the stone. This will keep the stone from coming out through the back once finished.
Step 2: Pick up your chain nose pliers and make a bend in the frame at the top on both sides. This will later be made into the bail of your pendant.
Step 3: Placing the pendant frame on your steel bench block, hammer it slightly all around and on the extensions that will become the bail. This is simply to harden the wire and give it a more finished look.
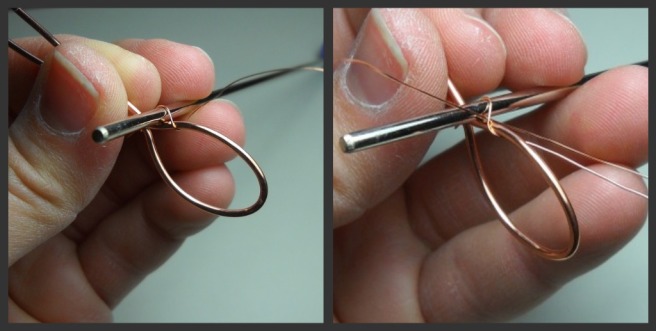
Step 4: Now take your length of 28 or 26 gauge wire and wrap it three times around the top of the frame to secure it. Now you want to grab your mandrel or 12 gauge piece of wire and wrap the wire over it to form a loop.
Step 5: Take the wire and weave it through the front of the frame. Once you have done this, take the end of the wire and and bring it back through your loop.
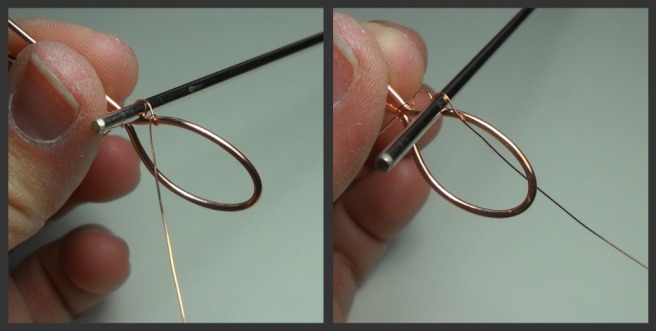
Step 6: Pull the wire all the way through the first loop, pulling it snug. Never put too much tension on the wire, as these smaller gauge wires will break quite easily. Remove the mandrel or pice of 12 gauge wire from the first loop and place it along side of it to start your next loop.
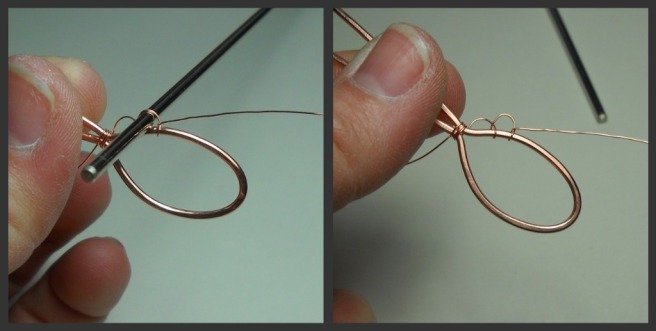
Step 7: Repeat the process of pulling the wire through the front of the frame to the back and weaving back through the loop.
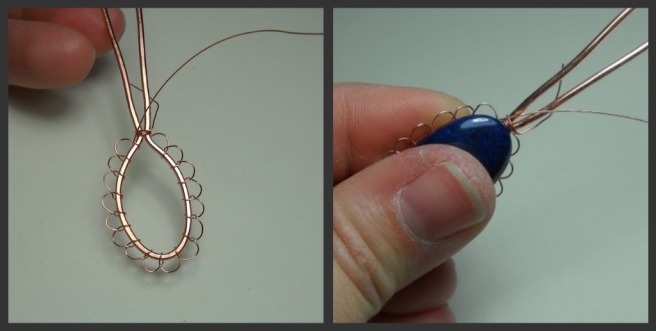
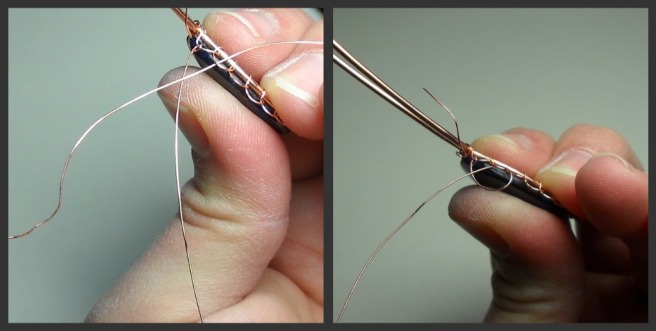
Step 8: Finish weaving your loops around the entire frame. You should end up with something similar to the first photo. Now grab your cabochon and place it on your frame. You are going to use your thumb and index finger to hold it securely on place while you start the next step of your bezel.
Step 9: Now you’re ready to get started on the bezel that will hold your cabochon in place. Taking the tail end of your 26 or 28 gauge wire, weave it through the first loop you made on the frame from BACK to FRONT. Alway bring the wire that is being woven from the back on over the top of the wire that is being fed from the front.
Step 10: Pull as lightly as you can on the wire once it’s fed all the way through from the back to the left and then to the right.
Step 11: Continue the process of weaving the end of the wire through the neck loop on the frame from back to front, making sure the wire being fed from the back is over top of the wire being fed from the front.
Step 12: Continue this weave around the entire frame.
Step 13: Once you’ve made you second row of loops, you are going to repeat the process once more, but this time feed the wire through the second row of loops. You still want to bring the wire from the front to the back and keep the wire being fed from the back over top of the wire being fed from the front.
Step 14: When you have finished your third row of loops, it’s time to finish off the bezel. The way I do this is by taking the end of my wire and instead of feeding it through the back of the next loop, I go up one row and weave it through the first loop in the previous row. Then again through the first row of loops until it is back at the frame.
Step 15: Weave the wire three times around the frame of your pendant and trim off any excess wire with your wire cutters.
Step 16: Take your wire cutters and trim off the ends of your “bail” to about 2″ (I always have extra wire!). Use your jewelers file to smooth the ends of the wire.
Step 17: Using loops forming pliers or a jump ring mandrel (I use the 6 mm setting for this pendant), form the loops for your bail, making sure they go from front to back.
Step 18: Take your round nose pliers and make an upward facing loop on the ends of the wire.
Step 19: Use your fingers to pinch the ends of the bail against the back of the pendant.
Step 20: If you’d like your bail to be a “V” shape, simply shape it with your finger until you are happy with it. If you would like the copper to be a darker brown color, you may darken it using liver of sulfur like in the title photo. I hope this tutorial was helpful!






thank you so much for your toturial
This is great tutorial! I’m a beginner, and I can follow it without any difficulty. It’s just what I’ve been looking for. Thank you!
TY for the tutorial! . This is one wire wrapping tech. I will try.
As for “some people”, they just don’t appreciate the fact that you DON’T HAVE TO share your knowledge with others. I found that, just by LOOKING AT THE PICS (ONLY), without even reading the how- to, it was EZ to figure out.
Just can’t pls everyone, I guess.
VERY APPRECIATIVE,
S. Masako
A wonderful tutorial. It is clear and detailed. It must be a lot of work to create a tutorial. Many thanks for sharing.
This is an awesome tutorial. However I do have one question. When you say from back to front, in those pictures is the back the side that your thumb is on or the side that your index finger is on? Between my kind of crappy monitor and not so great eyes, it’s a little difficult to see what’s happening with the wire in those two pictures.
Thank you! I’m glad you found this tutorial useful. When I say front to back, I mean you want to weave the wire from the front of the pendant to the the back. In the photos, the front will always be the side my thumb is holding and facing forward. I hope that answers your question!
Thank you Heidi! I’m a new jewelry instructor at Michaels and one of my students last night asked me how to make a wire-wrap bezel for a beautiful stone that she loves. This is perfect!
Thank you! thank you ! thank you! :0) i have been interested in this method for so long and since my money is funny I really appreciate the free Tutorial! I also had trouble with the front to back “thing”, but after reading it again I realized your “gist” was to get that last wire back to the Frame wire Neatly,so you could use the end to finish wrapping the base of the bail wires ,but also ensures that the “netting” section is secure and wont move around. Easy enough < i get it now! looking forward to seeing more of your tutes ,very easy to understand even for a beginner like me!
I’m so happy to have gotten such great feedback on this tutorial. I know it’s been a while since I’ve posted something new, but i have a couple in the works.
This looks very nice and I will try it. I think your photos and explanations are very clear and helpful. Thank you for putting this tutorial on line.
Thank you so much for this! I can’t wait to use this technique. As a beaded embrodery person, I can’t wait to try wire wrapping and I love this design! And thank you Laura Hansen of Cabbing Rough for forwarding this site to me!!!
this is a great tutorial!!! Thank you so much
Thank you! I’m glad you found it helpful.
Thank you for this tutorial! I love the elegant knit-look. Perfect! This is just what I want for my shiny black cab that has thin white veining. I think it calls for gold-filled wire, but I’ll practice with copper first.
Thank you!
You did a very nice job with this tutorial and it’s wonderful that you are sharing free advice for others. A great way to pay things forward.
Simply exellent. I will try it. Your step by step, photos and explanations are very clear and helpful. Thank you for share this tutorial on line. Pura vida!!! from Costa Rica.
A very clear tutorial – I can’t wait to try!
Thank you for the tutorial!
I am experimenting with pendant in this period and this is of great help!
Ambra
wow, brillient
Took me a bit to get the hang of it, not to mention working with a long length of wire, but it looked beautiful when finished. Thanks so much for helping mead to my skill set! A great way to use those cool undrilled stones!
Your very welcome!
I didn’t have any trouble following the directions – I found them clear, and the photos were extra-helpful! Of course, my pendant isn’t nearly as pretty as yours, but it’s not bad for a first effort. 🙂
Thanks a lot!
I’m sure it looks better than my first try at this technique! I’m glad you found my tutorial helpful. Thank you.
Any tips on preventing linking on long pieces of fine gauge wire?
When you are using long lengths of fine gauge wire, be sure that as you pull your wire through that there are no loops forming along the length. This is what will cause that “linking” and eventually breakage of the wire.
Thanks, I’ll watch for that!
Thank you so much. Looking forward to wrapping my lampwork beads. Very easy to follow and much appreciated.
You’re very welcome! I’d love to see some of your work.
I’m determined to make this! A friend gave me a whole lot of cabochons and he is waiting to see what I do with them. I am very sure that I saw you making this pendant on a video. Could you tell me where I could see it again?
I’ve never done a video tutorial, sorry. I’d be happy to answer any questions you may have though.
You know, the more I thought about it I realized that I thought “Video” because the whole tutorial flowed SO well! My first attempt ended when the wire broke *%^&$#@%! Second attempt nearing completion and I’m working more slowly and deliberately. That’s better. Problem was, I think, I SO want to see an end result that I rushed it a little. Not now!!! Thankyou for the tutorial Heidi, just wonderful. One question…Do you have any more to show? I can’t believe that I have learned another skill so easily and speedily, so I’m really eager for more! Thanks again!
I have broke many a wire with this technique! It takes some practice to get it down : )
Heidi! Second attempt finished! Can’t wait to see my friend’s face when he sees the 1st of his Cabochons made into a pendant! I’m SO grateful for this tutorial and hope for more. Thanks again.
Hi Heidi,
I am so anxious to try this great looking technique. I have carefully read this tutorial twice and things seem very clear. I hope to try it out later today, after I plant my seeds in my garden. Your pictures and directions seem very clear and I hope to be able to finish one soon. Thank you so much for this great tutorial.
Bonnie Berken
Your very welcome! Please let me know if you have any questions.
Hi Heidi,
I finished my first one and although the loops are not all even, I like it. I guess I like the free form feel that it has. I showed your tutorial to my beading circle last night and my beading buddies were very excited to try your technique. Thanks again. I am going to start another one now and try to focus on my loops more.
It takes some practice to get the right tension on the wire to get the netting even. Once you get it down it’s easier to manipulate the size and shape of your “loops.” Glad you enjoyed the tutorial 🙂
What a great project! It is so nice of you to spend the time to create a tutorial like this. We are so lucky you offered it for free!. I think the instructions are clear, especially since the photos are so detailed and match up flawlessly. This technique does take a little bit of practice to get the hang of, so folks need to have some patience, and allow themselves some practice time. Acquiring this weaving skill really is worth the extra effort and time spent. Thank You Very Much!
You’re so welcome! Thank you, it is a technique that requires practice to perfect 🙂
This is a beautiful way to wrap a stone. I’ve never done one yet, but this looks like with practice and following your instructions, I could get the hang of it. Thank you for sharing!
You’re welcome. I hope you enjoy the lesson 🙂
Oh, Heidi, you are the best!!! I have a bunch of sliced agate that I just couldn’t decide what to do with…now I have! You have done a marvelous job on this tutorial! I can’t wait to get started…thank you so very much!
Thank you! Have fun 🙂
I am pretty new to wire wrapping, and have mostly done pretty free-form stuff and variations on the so-called “hippy twist,” which are actually quite suitable for the beach rocks and sea glass that I am wrapping. Yesterday I finally completed my first reasonably-successful attempt (after several failures) at a traditional cab wrap–and I was ready to kick something. So I went searching for tutorials that might offer some hints for making the process easier. In the process I found this page, which intrigued me, and I’m in the middle of my first attempt. I have found one little trick which is helping a lot as far as making the loops even, and I’d like to share it.
When you wrap the wire around the mandrel to make the loop (I’m using the far end of a steel crochet hook for a mandrel) I discovered that if I first thread the wire tightly around the mandrel and through the frame to the OUTSIDE of the loop I’m creating, and make a tight U-bend in it around the frame in the correct position, then remove the mandrel and thread the wire back through the just-created loop, and the U-bend stays where I put it on the wire, as a reference point, I stand a much better chance of making even loops.
I came up with this method after I had made 3 hopelessly-uneven loops in one step each, trying to hold the mandrel and the hoop and the threading wire all at the same time and failing miserably to do so. I carefully unwound the wire (and it didn’t break!) and started over again, inventing the above method as I went. And it’s working very well, albeit a bit slow. But slow and neat (and pretty easy) is a lot better than faster and sloppy (and not easy!).
Maybe when I get better at handling wire and tools I’ll be able to do it all in one step–but for now, the two-step method is working beautifully.
If photographs would help explain the process, I’d be happy to try to take some and send them along. 🙂
This is definitely one of those techniques that you pick up your own little tips for along the way! 🙂
Good tutorial. Quite clear and elaborate. Will try it. I like the way you use the pin or needle for making the loop on the cabochon( for later viking knit finish on the second row) . I have used the round nose pliers ( for the tutorial I had) but I think it will be easy to manipulate just a nail or pin or even a double point needle to do this , like you showed. Thank you for sharing. Dita
http://www.alankarshilpa.etsy.com
Thank you! Your instructions and pictures are terrific. It is generous of you to share your expertise and spend the time give this free tutorial.
this tutorial is fantastic!! absolutely amazing!! thanks for sharing!!
Thank you so much for taking the time to post this free tutorial. Your instructions seem very easy to follow.
Thank you so much, Heidi. I do love this idea and have some cabochons that would like to try this on. I am grateful for your time in putting together the free tutorial. Is this or something similar available as a paid lesson? I’m such a chicken with 26 and 28 guage wire because I break it! Many thanks for your patience and generosity.
Very Nice! I wish I had seen your tutorial before I made my daughter a ‘wire crochet/stone necklace’ for her Christmas present. I crocheted two lengths using 28 gauge wire that fit around the stone and wove between the crochet lengths to make the ‘cage.’ It took forever because there were 7 stones and I ‘guessed’ at how it was done by looking at a necklace she admired. I have some extra stones so I’m going to try using your method. You have provided great pictures/instructions. Thank You.
I really like this because the wire does not overpower the stone, it compliments it while securing it. I wasn’t really turned on by wire jewelry when it started becoming popular because too many people got too carried away with the wire; the beauty of the stone would get lost under an overbearing mess of metallic spaghetti, lol! Now, when I see more graceful, elegant designs like this that enhance rather than encumber, I want to try it too! Beautifully done, and many thanks for the inspiration!
Thank you so much for this tutorial, Heidi. It’s beautifully done. I’m definitely going to try this out–I love the bail!
Thank you, and you’re very welcome 🙂
Awesome tutorial–Thanks so much. I’ve been searching forever for something like this. Also, love your bail–genius!! Thanks again! 🙂
What a fantastic tutorial. You rock!
Hi Heidil
Professional clear & beautifull TutorialTutorial!
i love it! Thank you so much I want to teach my girls from broken homes this TutorialI ן also ‘like to consult with you about a similar work I have a picture but I can’t attach it If you can help me I’d happy and the girls I would be happy even more
Thanks again
ronny
I’m so glad you enjoyed my tutorial and will be able to put it to good use!
Feel free to email your photo to me and I’ll see what I can do 🙂
hkinnally@hotmail.com
Thank you for sharing the tutorial. I’m going to have to give this a try. I think I have something that will work to do it, your instructions look very easy to follow.
Thank you. This is a wonderful new skill.
This is a beautiful design and it has been great with the added techniques.Thankyou for the effort you have shown in putting together this tut
Very great post. I just stumbled upon your weblog and wished
to mention that I’ve really enjoyed surfing
around your blog posts. After all I will be subscribing on your feed
and I’m hoping you write again very soon!